2007
 Shop
Shop
 Shed
Shed
BUILD YOURSELF A SMALL SHOP AND/OR A GARDEN TOOL SHED——CHEAP
by Dorothy Ainsworth
My friends jokingly call me the Winchester Woman because I am forever building new structures on my property or remodeling old ones. What may appear to be "Property Development Gone Wild" is simply my attempt to create a place for everything and put everything in its place. I think I'm still OK: I haven't built any stairways to nowhere...yet!
I had a log house for living in, a piano studio for playing in, and two small sheds for storage, but I had no shop for the construction tools and no shed for the garden tools. Everything was either covered by a tarp in the yard, with a rattlesnake hiding underneath, or stuck under the house gathering black widows, or leaned against a wall getting fried in the sun. And if I wanted to build something in the winter, I had to work on it in the house! (See Log Crib article) It was time to get organized.
 Main house
 Piano studio
I'm a single working gal barely making ends meet, so I have to watch every penny. My M.O. for outbuildings is to use low-cost materials and do the labor myself, but finish them off in such a manner as to be fairly attractive. Stud-frame construction is so straightforward and uncomplicated that almost anyone with rudimentary skills and a few basic tools can do it. I tend to build as simply and as easily as possible, but the bottom line is sturdy.
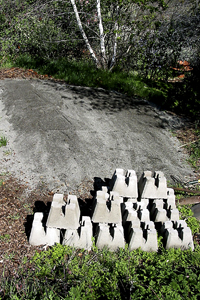
The 12' x 16' shop took me three months to build in my spare time, and the 6' x 12' tool shed only one month...just a blink of saw dust in the eye...and now they're forever useful on a daily basis. They cost $1500 and $600 respectively, which amounted to about $500/month in extra expenditures for four months. It stretched my budget, but at least I avoided the expense of a building permit. In my county it isn't required if the structure is under 200 sq.ft.
I checked prices at the local Home Depot and found a comparably-sized 6' x 12' shed kit selling for about $2,000. It was a shell, unfinished inside and with no insulation. I built mine, completely finished inside, for less than 1/3 of that. I can only imagine what my shop would have cost had I hired it done!
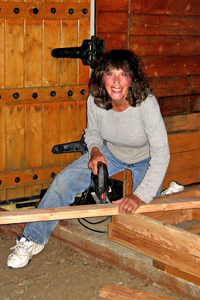 Dorothy building shop
My first step is always visualization, which leads to inspiration, which ultimately leads to a lot of perspiration. I sketch a little plan on scratch paper using standard dimensional lumber as my guide (to eliminate waste and complications), make a list of materials, drive to the lumber yard in my old $800 pickup truck, and get started. When I'm loading and unloading materials, sawing, drilling, hammering, bending, lifting, climbing ladders, panting, and groaning, I pretend that I'm at my old fitness center getting a full-body workout...in Levis instead of tights...and I don't even have to leave home or pay a membership fee. Trouble is, I miss gawking at the good-looking guys; my only social life is the dog.
The nice thing about working alone at a snail's pace (I am slow and deliberate), is I have time to think ahead. I don't plan every detail on paper, but I let the process dictate what to do next. I frame a doorway, for instance, to fit an odd-sized recycled door I've been saving. Same with windows. If I'm not sure how to make a stud-frame corner so it has a nailing surface for the inner-wall sheathing too, I look it up in a how-to-do-it book. I fasten everything together with screws, so if I have to take it back apart, I can. Screws hold better than nails, and using a drill is less trauma to my joints than pounding with a hammer.
 Stud-frame walls assembled on deck
 One wall up
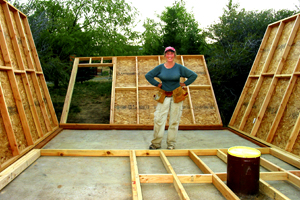 3 walls sheathed & going up
I just keep plugging along, measuring carefully, sawing straight, and making sure every step is plumb, level, and square. As hard as I try, I still make mistakes, but ultimately the job gets done in a reasonable amount of time, looks good, and serves its purpose. I love beauty, but I'm very practical; I try to combine the two concepts on a shoestring budget ...backwoods home style.
�Part 1: Shop
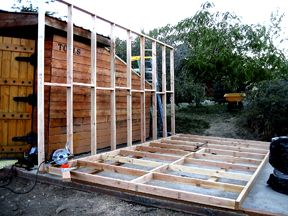
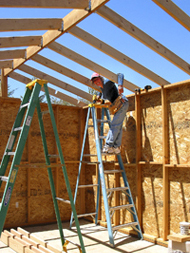
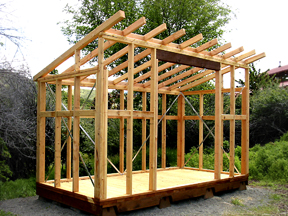
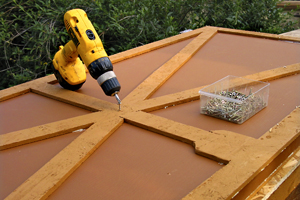
I had an existing concrete slab on the property that was poured years ago for something that never got built, so I used it for the shop foundation. With the highest grade of heavy duty construction adhesive available, I glued pressure-treated 2"x4"s around the 12' x 16' perimeter of the slab. Next I built the frame with 2"x4"s at 2' on center (OC). I sheathed the walls while they were down on the floor before erecting them into place. Then I fastened the raised walls with 3" screws to the pressure-treated (PT) base-plate every 12" inches, and to each other at the corners. The next step was putting up the 2"x6" rafters at 2' OC and the important rafters ties. The 2"x6" ties at 4' OC spanned across the tops of the walls to stabilize the structure, and provided a nailing surface for the ceiling boards.
 Ridge beam up
 "Lookouts" provide roof overhang
 Interior view
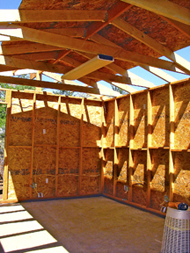 Rafter ties stabalize roof
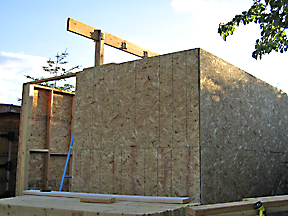
 Roof sheathing going on
 Back door opening
 Let there be light
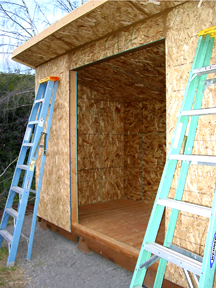
I wired the building inside the wall cavities by tapping into an existing circuit breaker in a nearby outbuilding. After installing the fiberglass insulation, which also covered the wiring, I put up the inside 4'x 8' sheets of 7/16" oriented-strand-board (OSB) sheathing. Then I put up 1"x12" x 16-foot pine ceiling boards, for a touch of beauty, and also to serve as a strong wood surface from which to hang the fluorescent light fixture.
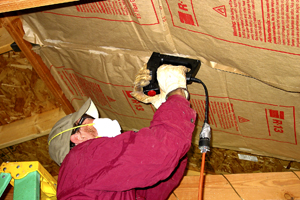 Friend Jason installing insulation
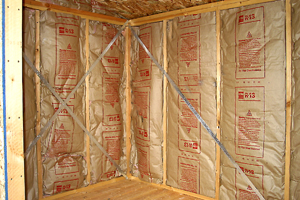 Insulation & cross braces
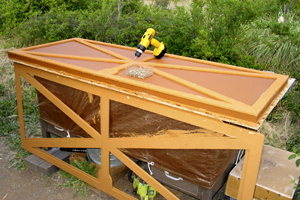
I roofed with inexpensive rolled roofing...quick and easy.
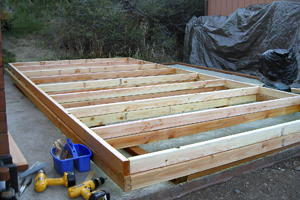
 Building deck
 Finished deck
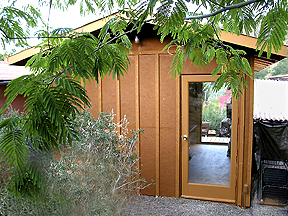
I used an old recycled glass-paned door as the back door of the shop and built a 4' x 7.5' door from 1"x4" cheap utility-grade pine for the front door opening.
 Back door
 Front door
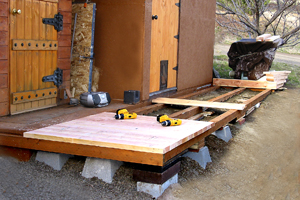
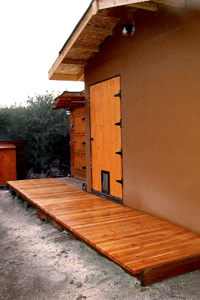
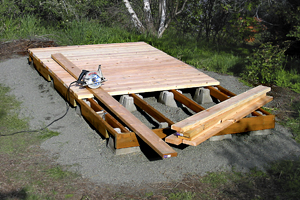
Last but certainly not least (for the tough job leveling the piers in hard dirt), I built a long narrow deck set on piers, with pressure treated 4"x4" runners fastened to the top of the piers, and topped it off with 2"x6" Douglas fir (DF) decking.

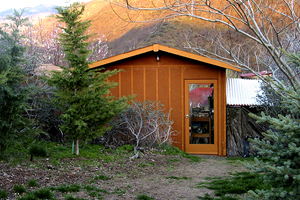
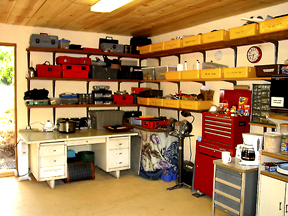 Finished shop with shelving & tools
 44" wide door
When all the construction work was done, I cut 2" wide batts out of leftover OSB sheathing and screwed them on vertically 12" apart for a decorative board-and-batt look. I then painted everything inside and out, including the floor, for a light-colored clean look.
The final work entailed installing L-brackets and shelving to hold all the tools, paint cans, and hardware supplies I have. I used old recycled I-beam floor joists (BCI's) for the shelves. They have a built-in lip so things can't fall off the edge...and the price was right (free from a local contractor's building site). Mission accomplished.
Part 2: Garden Tool Shed
I leveled a conveniently located spot as best I could by hand and then drove my pickup to a landscape supplier and got a cu. yd. of construction-grade sand. Sand is a good base because it has 100% compaction if left undisturbed under a building. It didn't take long to unload it and distribute the piers on the bed of sand in their approximate rows. Using stakes and strings as guides for squaring and leveling the piers with each other, I put more sand underneath the low ones and wiggled the high ones down into the sand. The perimeter strings kept me inside the foundation's 6' x 12' boundary.
 Leveled spot covered with sand
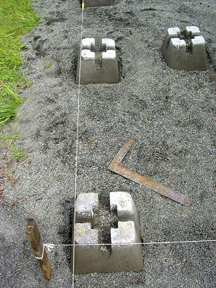 Piers set
The next step was a piece of cake...setting the pressure-treated (PT) 2"x4"s in the pier slots, and connecting the perimeter all around with PT 2"x6"s.
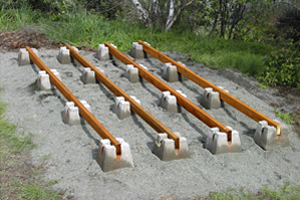 Piers with 2x6 PT runners
 Rim joists tie foundation together
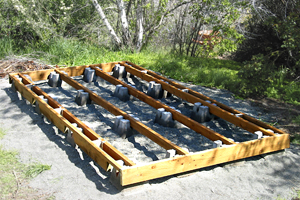
I decked the floor framing with DF 2"x6"s and laid out my first wall framing on the nice flat surface, fastening the studs to the top and bottom plates at 2"OC. with 3" screws.
 2x6 floor boards
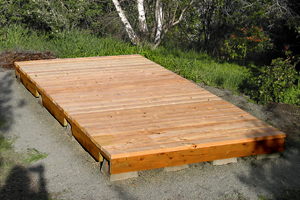 Finished platform
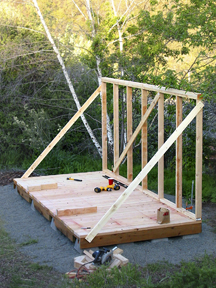 Back wall up & braced
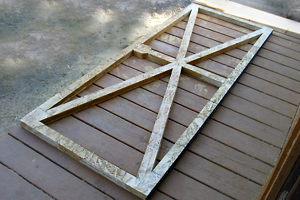
 Side view of frame
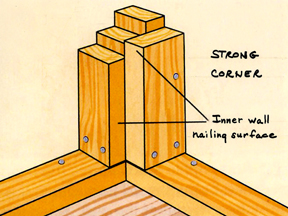 Corner studs create inner-wall sheathing surface to nail to
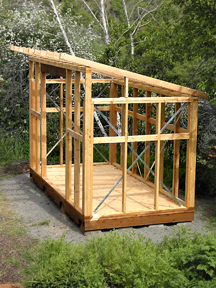
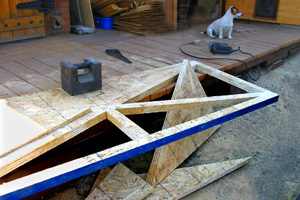
Just as I did with the shop, I made all the 2"x4" wall frames while they were down on the floor, then erected them on site and fastened them to the floor with screws, and to each other at the corners. After I stood the back wall up plumb, I braced it on each side with a diagonal 1"x4" attached to the top side of the back-wall and the low front-side of the platform, until I got the side-walls up. I wanted double doors, so I put up a 6"x8"x 5-foot header over the 5-ft. opening and supported it with an extra 2"x4" stud (called a jack) fastened to the door frame on each side. Headers provide roof support over wide spans.
 3/4 view of frame
 Sheathed & roofed
 Hurricane ties hold down rafter tails
Rafters were next: 2"x4"s set at 16" OC. I used hurricane ties on both ends to secure them in place.
I sheathed the outside walls and the roof with OSB, and then put the fiberglass insulation in. Then I sheathed the inside of the shed and even the wood floor with OSB...to protect it against dirty tools and possibly grease and oil. I can remove or replace the OSB anytime I want, and the wood floor will stay fresh and clean underneath.
I built a ramp out of PT 2"x4"s and decked it with DF 2"x4"s.
As I did for the shop, and because the buildings are only 50 feet apart, I made 2"-wide batts out of OSB to repeat the theme of the board-and-batt look.
I bought two narrow old doors from a builder's bargain outlet for only $10/ea. and decorated them with OSB X's I cut out of four single sheets of OSB (only $6/ea.), stacked on top of each other and marked with a template, so I could cut them all at once.
 Temporary cleats nailed to rim joist to support OSB while screwing it on.
Clamps hold the top.
Temporary cleats nailed to rim joist to support OSB while screwing it on.
Clamps hold the top.
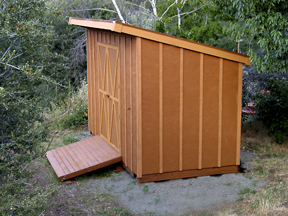
 Basic shed finished
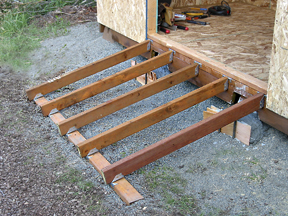 Ramp framing
 Ramp done
I splashed a coat of paint on the entire structure, inside and out, and again roofed with cheap rolled roofing.
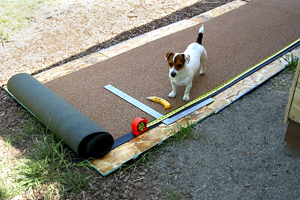 "Peaches" helps cut rolled roofing
 Profile
 Making door design in one piece
 Door decor
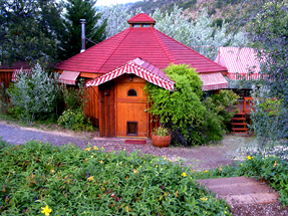
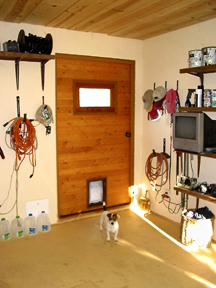
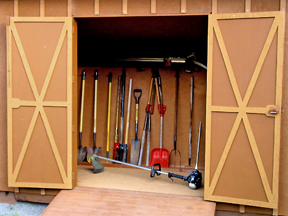 Tool shed finished
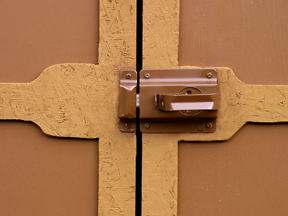 Door hardware
I installed a door latch, and then U-brackets to cradle my garden tool handles. I stood all the tools up in a row along the back wall, where they are kept in place by their handles. I'm still moving the tools in a few at a time as I dig them out from their hiding places all over the property.
 Dorothy 2007
It feels so good to be organized!
General cost of materials, generously rounded up to cover any overages:
SHOP:
Total ----------------------------------------------$1500
Note: For a shop on a pier foundation like the shed's, add $300
SHED:
Total------------------------------------------------$600